I had an interesting question from a reader of my PySide6 book, about how to handle dragging and dropping of widgets in a container showing the dragged widget as it is moved.
I'm interested in managing movement of a QWidget with mouse in a container. I've implemented the application with drag & drop, exchanging the position of buttons, but I want to show the motion of QPushButton, like what you see in Qt Designer. Dragging a widget should show the widget itself, not just the mouse pointer.
First, we'll implement the simple case which drags widgets without showing anything extra. Then we can extend it to answer the question. By the end of this quick tutorial we'll have a generic drag drop implementation which looks like the following.
We'll start with a simple application which creates a window using QWidget and places a series of QPushButton widgets into it.
You can substitute QPushButton for any other widget you like, e.g. QLabel. Any widget can have drag behavior implemented on it, although some input widgets will not work well as we capture the mouse events for the drag.
python
from PySide6.QtWidgets import QApplication, QHBoxLayout, QPushButton, QWidget


class Window(QWidget):
    def __init__(self):
        super().__init__()

        self.blayout = QHBoxLayout()
        for l in ["A", "B", "C", "D"]:
            btn = QPushButton(l)
            self.blayout.addWidget(btn)

        self.setLayout(self.blayout)


app = QApplication([])
w = Window()
w.show()

app.exec()
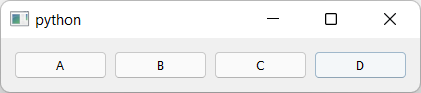
If you run this you should see something like this.
 The series of
 QPushButton widgets in a horizontal layout.
Here we're creating a window, but the Window widget is subclassed from QWidget, meaning you can add this widget to any other layout. See later for an example of a generic object sorting widget.
QPushButton objects aren't usually draggable, so to handle the mouse movements and initiate a drag we need to implement a subclass. We can add the following to the top of the file.
python
from PySide6.QtCore import QMimeData, Qt
from PySide6.QtGui import QDrag
from PySide6.QtWidgets import QApplication, QHBoxLayout, QPushButton, QWidget


class DragButton(QPushButton):
    def mouseMoveEvent(self, e):
        if e.buttons() == Qt.MouseButton.LeftButton:
            drag = QDrag(self)
            mime = QMimeData()
            drag.setMimeData(mime)
            drag.exec(Qt.DropAction.MoveAction)
We implement a mouseMoveEvent which accepts the single e parameter of the event. We check to see if the left mouse button is pressed on this event -- as it would be when dragging -- and then initiate a drag. To start a drag, we create a QDrag object, passing in self to give us access later to the widget that was dragged. We also must pass in mime data. This is used for including information about what is dragged, particularly for passing data between applications. However, as here, it is fine to leave this empty.
Finally, we initiate a drag by calling drag.exec_(Qt.MoveAction). As with dialogs exec_() starts a new event loop, blocking the main loop until the drag is complete. The parameter Qt.MoveAction tells the drag handler what type of operation is happening, so it can show the appropriate icon tip to the user.
You can update the main window code to use our new DragButton class as follows.
python
class Window(QWidget):
    def __init__(self):
        super().__init__()
        self.setAcceptDrops(True)

        self.blayout = QHBoxLayout()
        for l in ["A", "B", "C", "D"]:
            btn = DragButton(l)
            self.blayout.addWidget(btn)

        self.setLayout(self.blayout)

    def dragEnterEvent(self, e):
        e.accept()
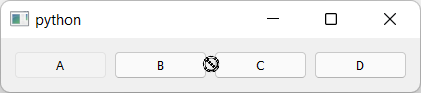
If you run the code now, you can drag the buttons, but you'll notice the drag is forbidden.
 Dragging of the widget starts but is forbidden.
What's happening? The mouse movement is being detected by our DragButton object and the drag started, but the main window does not accept drag & drop.
To fix this we need to enable drops on the window and implement dragEnterEvent to actually accept them.
python
class Window(QWidget):
    def __init__(self):
        super().__init__()
        self.setAcceptDrops(True)

        self.blayout = QHBoxLayout()
        for l in ["A", "B", "C", "D"]:
            btn = DragButton(l)
            self.blayout.addWidget(btn)

        self.setLayout(self.blayout)

    def dragEnterEvent(self, e):
        e.accept()
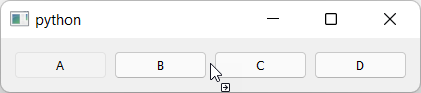
If you run this now, you'll see the drag is now accepted and you see the move icon. This indicates that the drag has started and been accepted by the window we're dragging onto. The icon shown is determined by the action we pass when calling drag.exec_().
 Dragging of the widget starts and is accepted, showing a move icon.
Releasing the mouse button during a drag drop operation triggers a dropEvent on the widget you're currently hovering the mouse over (if it is configured to accept drops). In our case that's the window. To handle the move we need to implement the code to do this in our dropEvent method.
The drop event contains the position the mouse was at when the button was released & the drop triggered. We can use this to determine where to move the widget to.
To determine where to place the widget, we iterate over all the widgets in the layout, until we find one who's x position is greater than that of the mouse pointer. If so then when insert the widget directly to the left of this widget and exit the loop.
If we get to the end of the loop without finding a match, we must be dropping past the end of the existing items, so we increment n one further (in the else: block below).
python
    def dropEvent(self, e):
        pos = e.position()
        widget = e.source()
        self.blayout.removeWidget(widget)

        for n in range(self.blayout.count()):
            # Get the widget at each index in turn.
            w = self.blayout.itemAt(n).widget()
            if pos.x() < w.x():
                # We didn't drag past this widget.
                # insert to the left of it.
                break
        else:
            # We aren't on the left hand side of any widget,
            # so we're at the end. Increment 1 to insert after.
            n += 1

        self.blayout.insertWidget(n, widget)

        e.accept()
The effect of this is that if you drag 1 pixel past the start of another widget the drop will happen to the right of it, which is a bit confusing. To fix this we can adjust the cut off to use the middle of the widget using if pos.x() < w.x() + w.size().width() // 2: -- that is x + half of the width.
python
    def dropEvent(self, e):
        pos = e.position()
        widget = e.source()
        self.blayout.removeWidget(widget)

        for n in range(self.blayout.count()):
            # Get the widget at each index in turn.
            w = self.blayout.itemAt(n).widget()
            if pos.x() < w.x() + w.size().width() // 2:
                # We didn't drag past this widget.
                # insert to the left of it.
                break
        else:
            # We aren't on the left hand side of any widget,
            # so we're at the end. Increment 1 to insert after.
            n += 1

        self.blayout.insertWidget(n, widget)

        e.accept()
The complete working drag-drop code is shown below.
python
from PySide6.QtCore import QMimeData, Qt
from PySide6.QtGui import QDrag
from PySide6.QtWidgets import QApplication, QHBoxLayout, QPushButton, QWidget


class DragButton(QPushButton):
    def mouseMoveEvent(self, e):
        if e.buttons() == Qt.MouseButton.LeftButton:
            drag = QDrag(self)
            mime = QMimeData()
            drag.setMimeData(mime)
            drag.exec(Qt.DropAction.MoveAction)


class Window(QWidget):
    def __init__(self):
        super().__init__()
        self.setAcceptDrops(True)

        self.blayout = QHBoxLayout()
        for l in ["A", "B", "C", "D"]:
            btn = DragButton(l)
            self.blayout.addWidget(btn)

        self.setLayout(self.blayout)

    def dragEnterEvent(self, e):
        e.accept()

    def dropEvent(self, e):
        pos = e.position()
        widget = e.source()
        self.blayout.removeWidget(widget)

        for n in range(self.blayout.count()):
            # Get the widget at each index in turn.
            w = self.blayout.itemAt(n).widget()
            if pos.x() < w.x() + w.size().width() // 2:
                # We didn't drag past this widget.
                # insert to the left of it.
                break
        else:
            # We aren't on the left hand side of any widget,
            # so we're at the end. Increment 1 to insert after.
            n += 1

        self.blayout.insertWidget(n, widget)

        e.accept()


app = QApplication([])
w = Window()
w.show()

app.exec()
Visual Drag & Drop
We now have a working drag & drop implementation. Next we'll move onto improving the UX by showing the drag visually. First we'll add support for showing the button being dragged next to the mouse point as it is dragged. That way the user knows exactly what it is they are dragging.
Qt's QDrag handler natively provides a mechanism for showing dragged objects which we can use. We can update our DragButton class to pass a pixmap image to QDrag and this will be displayed under the mouse pointer as the drag occurs. To show the widget, we just need to get a QPixmap of the widget we're dragging.
python
from PySide6.QtCore import QMimeData, Qt
from PySide6.QtGui import QDrag
from PySide6.QtWidgets import QApplication, QHBoxLayout, QPushButton, QWidget


class DragButton(QPushButton):
    def mouseMoveEvent(self, e):
        if e.buttons() == Qt.MouseButton.LeftButton:
            drag = QDrag(self)
            mime = QMimeData()
            drag.setMimeData(mime)
            drag.exec(Qt.DropAction.MoveAction)
To create the pixmap we create a QPixmap object passing in the size of the widget this event is fired on with self.size(). This creates an empty pixmap which we can then pass into self.render to render -- or draw -- the current widget onto it. That's it. Then we set the resulting pixmap on the drag object.
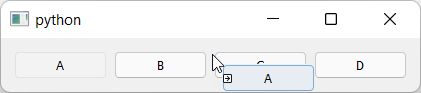
If you run the code with this modification you'll see something like the following --
 Dragging of the widget showing the dragged widget.
Generic Drag & Drop Container
We now have a working drag and drop behavior implemented on our window. We can take this a step further and implement a generic drag drop widget which allows us to sort arbitrary objects. In the code below we've created a new widget DragWidget which can be added to any window.
You can add items -- instances of DragItem -- which you want to be sorted, as well as setting data on them. When items are re-ordered the new order is emitted as a signal orderChanged.
python
from PySide6.QtCore import QMimeData, Qt, Signal
from PySide6.QtGui import QDrag, QPixmap
from PySide6.QtWidgets import (
    QApplication,
    QHBoxLayout,
    QLabel,
    QMainWindow,
    QVBoxLayout,
    QWidget,
)


class DragItem(QLabel):
    def __init__(self, *args, **kwargs):
        super().__init__(*args, **kwargs)
        self.setContentsMargins(25, 5, 25, 5)
        self.setAlignment(Qt.AlignmentFlag.AlignCenter)
        self.setStyleSheet("border: 1px solid black;")
        # Store data separately from display label, but use label for default.
        self.data = self.text()

    def set_data(self, data):
        self.data = data

    def mouseMoveEvent(self, e):
        if e.buttons() == Qt.MouseButton.LeftButton:
            drag = QDrag(self)
            mime = QMimeData()
            drag.setMimeData(mime)

            pixmap = QPixmap(self.size())
            self.render(pixmap)
            drag.setPixmap(pixmap)

            drag.exec(Qt.DropAction.MoveAction)


class DragWidget(QWidget):
    """
    Generic list sorting handler.
    """

    orderChanged = Signal(list)

    def __init__(self, *args, orientation=Qt.Orientation.Vertical, **kwargs):
        super().__init__()
        self.setAcceptDrops(True)

        # Store the orientation for drag checks later.
        self.orientation = orientation

        if self.orientation == Qt.Orientation.Vertical:
            self.blayout = QVBoxLayout()
        else:
            self.blayout = QHBoxLayout()

        self.setLayout(self.blayout)

    def dragEnterEvent(self, e):
        e.accept()

    def dropEvent(self, e):
        pos = e.position()
        widget = e.source()
        self.blayout.removeWidget(widget)

        for n in range(self.blayout.count()):
            # Get the widget at each index in turn.
            w = self.blayout.itemAt(n).widget()
            if self.orientation == Qt.Orientation.Vertical:
                # Drag drop vertically.
                drop_here = pos.y() < w.y() + w.size().height() // 2
            else:
                # Drag drop horizontally.
                drop_here = pos.x() < w.x() + w.size().width() // 2

            if drop_here:
                break

        else:
            # We aren't on the left hand/upper side of any widget,
            # so we're at the end. Increment 1 to insert after.
            n += 1

        self.blayout.insertWidget(n, widget)
        self.orderChanged.emit(self.get_item_data())

        e.accept()

    def add_item(self, item):
        self.blayout.addWidget(item)

    def get_item_data(self):
        data = []
        for n in range(self.blayout.count()):
            # Get the widget at each index in turn.
            w = self.blayout.itemAt(n).widget()
            data.append(w.data)
        return data


class MainWindow(QMainWindow):
    def __init__(self):
        super().__init__()
        self.drag = DragWidget(orientation=Qt.Orientation.Vertical)
        for n, l in enumerate(["A", "B", "C", "D"]):
            item = DragItem(l)
            item.set_data(n)  # Store the data.
            self.drag.add_item(item)

        # Print out the changed order.
        self.drag.orderChanged.connect(print)

        container = QWidget()
        layout = QVBoxLayout()
        layout.addStretch(1)
        layout.addWidget(self.drag)
        layout.addStretch(1)
        container.setLayout(layout)

        self.setCentralWidget(container)


app = QApplication([])
w = MainWindow()
w.show()

app.exec()
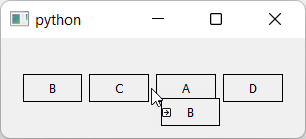 Generic drag-drop sorting in horizontal orientation.
You'll notice that when creating the item, you can set the label by passing it in as a parameter (just like for a normal QLabel which we've subclassed from). But you can also set a data value, which is the internal value of this item -- this is what will be emitted when the order changes, or if you call get_item_data yourself. This separates the visual representation from what is actually being sorted, meaning you can use this to sort anything not just strings.
In the example above we're passing in the enumerated index as the data, so dragging will output (via the print connected to orderChanged) something like:
python
[1, 0, 2, 3]
[1, 2, 0, 3]
[1, 0, 2, 3]
[1, 2, 0, 3]
If you remove the item.set_data(n) you'll see the labels emitted on changes.
python
['B', 'A', 'C', 'D']
['B', 'C', 'A', 'D']
We've also implemented orientation onto the DragWidget using the Qt built in flags Qt.Orientation.Vertical or Qt.Orientation.Horizontal. This setting this allows you sort items either vertically or horizontally -- the calculations are handled for both directions.
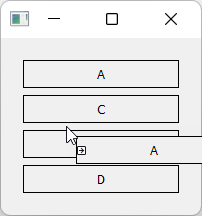 Generic drag-drop sorting in vertical orientation.
Adding a Visual Drop Target
If you experiment with the drag-drop tool above you'll notice that it doesn't feel completely intuitive. When dragging you don't know where an item will be inserted until you drop it. If it ends up in the wrong place, you'll then need to pick it up and re-drop it again, using guesswork to get it right.
With a bit of practice you can get the hang of it, but it would be nicer to make the behavior immediately obvious for users. Many drag-drop interfaces solve this problem by showing a preview of where the item will be dropped while dragging -- either by showing the item in the place where it will be dropped, or showing some kind of placeholder.
In this final section we'll implement this type of drag and drop preview indicator.
The first step is to define our target indicator. This is just another label, which in our example is empty, with custom styles applied to make it have a solid "shadow" like background. This makes it obviously different to the items in the list, so it stands out as something distinct.
python
from PySide6.QtCore import QMimeData, Qt, Signal
from PySide6.QtGui import QDrag, QPixmap
from PySide6.QtWidgets import (
    QApplication,
    QHBoxLayout,
    QLabel,
    QMainWindow,
    QVBoxLayout,
    QWidget,
)


class DragTargetIndicator(QLabel):
    def __init__(self, parent=None):
        super().__init__(parent)
        self.setContentsMargins(25, 5, 25, 5)
        self.setStyleSheet(
            "QLabel { background-color: #ccc; border: 1px solid black; }"
        )
We've copied the contents margins from the items in the list. If you change your list items, remember to also update the indicator dimensions to match.
The drag item is unchanged, but we need to implement some additional behavior on our DragWidget to add the target, control showing and moving it.
First we'll add the drag target indicator to the layout on our DragWidget. This is hidden to begin with, but will be shown during the drag.
python
class DragWidget(QWidget):
    """
    Generic list sorting handler.
    """

    orderChanged = Signal(list)

    def __init__(self, *args, orientation=Qt.Orientation.Vertical, **kwargs):
        super().__init__()
        self.setAcceptDrops(True)

        # Store the orientation for drag checks later.
        self.orientation = orientation

        if self.orientation == Qt.Orientation.Vertical:
            self.blayout = QVBoxLayout()
        else:
            self.blayout = QHBoxLayout()

        # Add the drag target indicator. This is invisible by default,
        # we show it and move it around while the drag is active.
        self._drag_target_indicator = DragTargetIndicator()
        self.blayout.addWidget(self._drag_target_indicator)
        self._drag_target_indicator.hide()

        self.setLayout(self.blayout)
Next we modify the DragWidget.dragMoveEvent to show the drag target indicator. We show it by inserting it into the layout and then calling .show -- inserting a widget which is already in a layout will move it. We also hide the original item which is being dragged.
In the earlier examples we determined the position on drop by removing the widget being dragged, and then iterating over what is left. Because we now need to calculate the drop location before the drop, we take a different approach.
If we wanted to do it the same way, we'd need to remove the item on drag start, hold onto it and implement re-inserting at it's old position on drag fail. That's a lot of work.
Instead, the dragged item is left in place and hidden during move.
python
    def dragMoveEvent(self, e):
        # Find the correct location of the drop target, so we can move it there.
        index = self._find_drop_location(e)
        if index is not None:
            # Inserting moves the item if its alreaady in the layout.
            self.blayout.insertWidget(index, self._drag_target_indicator)
            # Hide the item being dragged.
            e.source().hide()
            # Show the target.
            self._drag_target_indicator.show()
        e.accept()
The method self._find_drop_location finds the index where the drag target will be shown (or the item dropped when the mouse released). We'll implement that next.
The calculation of the drop location follows the same pattern as before. We iterate over the items in the layout and calculate whether our mouse drop location is to the left of each widget. If it isn't to the left of any widget, we drop on the far right.
python
    def _find_drop_location(self, e):
        pos = e.position()
        spacing = self.blayout.spacing() / 2

        for n in range(self.blayout.count()):
            # Get the widget at each index in turn.
            w = self.blayout.itemAt(n).widget()

            if self.orientation == Qt.Orientation.Vertical:
                # Drag drop vertically.
                drop_here = (
                    pos.y() >= w.y() - spacing
                    and pos.y() <= w.y() + w.size().height() + spacing
                )
            else:
                # Drag drop horizontally.
                drop_here = (
                    pos.x() >= w.x() - spacing
                    and pos.x() <= w.x() + w.size().width() + spacing
                )

            if drop_here:
                # Drop over this target.
                break

        return n
The drop location n is returned for use in the dragMoveEvent to place the drop target indicator.
Next wee need to update the get_item_data handler to ignore the drop target indicator. To do this we check w against self._drag_target_indicator and skip if it is the same. With this change the method will work as expected.
python
    def get_item_data(self):
        data = []
        for n in range(self.blayout.count()):
            # Get the widget at each index in turn.
            w = self.blayout.itemAt(n).widget()
            if w != self._drag_target_indicator:
                # The target indicator has no data.
                data.append(w.data)
        return data
If you run the code a this point the drag behavior will work as expected. But if you drag the widget outside of the window and drop you'll notice a problem: the target indicator will stay in place, but dropping the item won't drop the item in that position (the drop will be cancelled).
To fix that we need to implement a dragLeaveEvent which hides the indicator.
python
    def dragLeaveEvent(self, e):
        self._drag_target_indicator.hide()
        e.accept()
With those changes, the drag-drop behavior should be working as intended. The complete code is shown below.
python
from PySide6.QtCore import QMimeData, Qt, Signal
from PySide6.QtGui import QDrag, QPixmap
from PySide6.QtWidgets import (
    QApplication,
    QHBoxLayout,
    QLabel,
    QMainWindow,
    QVBoxLayout,
    QWidget,
)


class DragTargetIndicator(QLabel):
    def __init__(self, parent=None):
        super().__init__(parent)
        self.setContentsMargins(25, 5, 25, 5)
        self.setStyleSheet(
            "QLabel { background-color: #ccc; border: 1px solid black; }"
        )


class DragItem(QLabel):
    def __init__(self, *args, **kwargs):
        super().__init__(*args, **kwargs)
        self.setContentsMargins(25, 5, 25, 5)
        self.setAlignment(Qt.AlignmentFlag.AlignCenter)
        self.setStyleSheet("border: 1px solid black;")
        # Store data separately from display label, but use label for default.
        self.data = self.text()

    def set_data(self, data):
        self.data = data

    def mouseMoveEvent(self, e):
        if e.buttons() == Qt.MouseButton.LeftButton:
            drag = QDrag(self)
            mime = QMimeData()
            drag.setMimeData(mime)

            pixmap = QPixmap(self.size())
            self.render(pixmap)
            drag.setPixmap(pixmap)

            drag.exec(Qt.DropAction.MoveAction)
            self.show() # Show this widget again, if it's dropped outside.


class DragWidget(QWidget):
    """
    Generic list sorting handler.
    """

    orderChanged = Signal(list)

    def __init__(self, *args, orientation=Qt.Orientation.Vertical, **kwargs):
        super().__init__()
        self.setAcceptDrops(True)

        # Store the orientation for drag checks later.
        self.orientation = orientation

        if self.orientation == Qt.Orientation.Vertical:
            self.blayout = QVBoxLayout()
        else:
            self.blayout = QHBoxLayout()

        # Add the drag target indicator. This is invisible by default,
        # we show it and move it around while the drag is active.
        self._drag_target_indicator = DragTargetIndicator()
        self.blayout.addWidget(self._drag_target_indicator)
        self._drag_target_indicator.hide()

        self.setLayout(self.blayout)

    def dragEnterEvent(self, e):
        e.accept()

    def dragLeaveEvent(self, e):
        self._drag_target_indicator.hide()
        e.accept()

    def dragMoveEvent(self, e):
        # Find the correct location of the drop target, so we can move it there.
        index = self._find_drop_location(e)
        if index is not None:
            # Inserting moves the item if its alreaady in the layout.
            self.blayout.insertWidget(index, self._drag_target_indicator)
            # Hide the item being dragged.
            e.source().hide()
            # Show the target.
            self._drag_target_indicator.show()
        e.accept()

    def dropEvent(self, e):
        widget = e.source()
        # Use drop target location for destination, then remove it.
        self._drag_target_indicator.hide()
        index = self.blayout.indexOf(self._drag_target_indicator)
        if index is not None:
            self.blayout.insertWidget(index, widget)
            self.orderChanged.emit(self.get_item_data())
            widget.show()
            self.blayout.activate()
        e.accept()

    def _find_drop_location(self, e):
        pos = e.position()
        spacing = self.blayout.spacing() / 2

        for n in range(self.blayout.count()):
            # Get the widget at each index in turn.
            w = self.blayout.itemAt(n).widget()

            if self.orientation == Qt.Orientation.Vertical:
                # Drag drop vertically.
                drop_here = (
                    pos.y() >= w.y() - spacing
                    and pos.y() <= w.y() + w.size().height() + spacing
                )
            else:
                # Drag drop horizontally.
                drop_here = (
                    pos.x() >= w.x() - spacing
                    and pos.x() <= w.x() + w.size().width() + spacing
                )

            if drop_here:
                # Drop over this target.
                break

        return n

    def add_item(self, item):
        self.blayout.addWidget(item)

    def get_item_data(self):
        data = []
        for n in range(self.blayout.count()):
            # Get the widget at each index in turn.
            w = self.blayout.itemAt(n).widget()
            if w != self._drag_target_indicator:
                # The target indicator has no data.
                data.append(w.data)
        return data


class MainWindow(QMainWindow):
    def __init__(self):
        super().__init__()
        self.drag = DragWidget(orientation=Qt.Orientation.Vertical)
        for n, l in enumerate(["A", "B", "C", "D"]):
            item = DragItem(l)
            item.set_data(n)  # Store the data.
            self.drag.add_item(item)

        # Print out the changed order.
        self.drag.orderChanged.connect(print)

        container = QWidget()
        layout = QVBoxLayout()
        layout.addStretch(1)
        layout.addWidget(self.drag)
        layout.addStretch(1)
        container.setLayout(layout)

        self.setCentralWidget(container)


app = QApplication([])
w = MainWindow()
w.show()

app.exec()
If you run this example on macOS you may notice that the widget drag preview (the QPixmap created on DragItem) is a bit blurry. On high-resolution screens you need to set the device pixel ratio and scale up the pixmap when you create it. Below is a modified DragItem class which does this.
Update DragItem to support high resolution screens.
python
class DragItem(QLabel):
    def __init__(self, *args, **kwargs):
        super().__init__(*args, **kwargs)
        self.setContentsMargins(25, 5, 25, 5)
        self.setAlignment(Qt.AlignmentFlag.AlignCenter)
        self.setStyleSheet("border: 1px solid black;")
        # Store data separately from display label, but use label for default.
        self.data = self.text()

    def set_data(self, data):
        self.data = data

    def mouseMoveEvent(self, e):
        if e.buttons() == Qt.MouseButton.LeftButton:
            drag = QDrag(self)
            mime = QMimeData()
            drag.setMimeData(mime)

            # Render at x2 pixel ratio to avoid blur on Retina screens.
            pixmap = QPixmap(self.size().width() * 2, self.size().height() * 2)
            pixmap.setDevicePixelRatio(2)
            self.render(pixmap)
            drag.setPixmap(pixmap)

            drag.exec(Qt.DropAction.MoveAction)
            self.show() # Show this widget again, if it's dropped outside.
That's it! We've created a generic drag-drop handled which can be added to any projects where you need to be able to reposition items within a list. You should feel free to experiment with the styling of the drag items and targets as this won't affect the behavior.


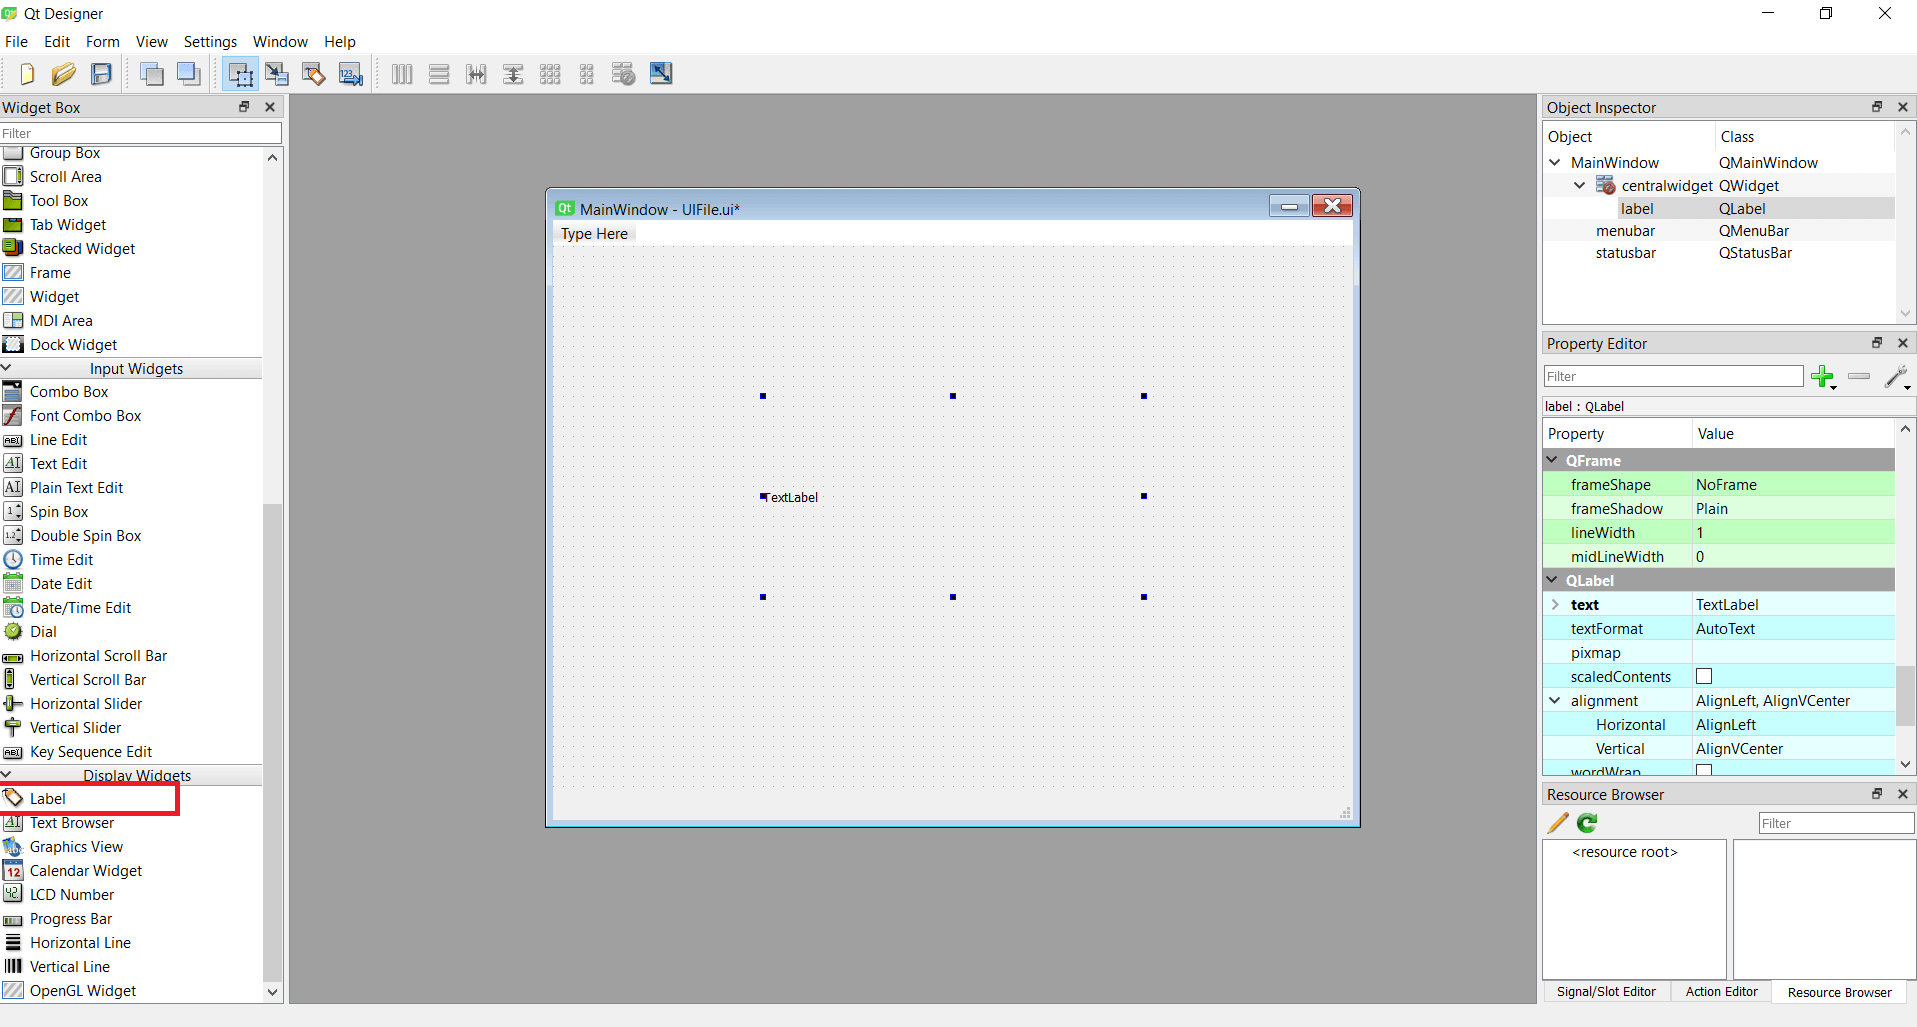 MainWindow with a single QLabel added
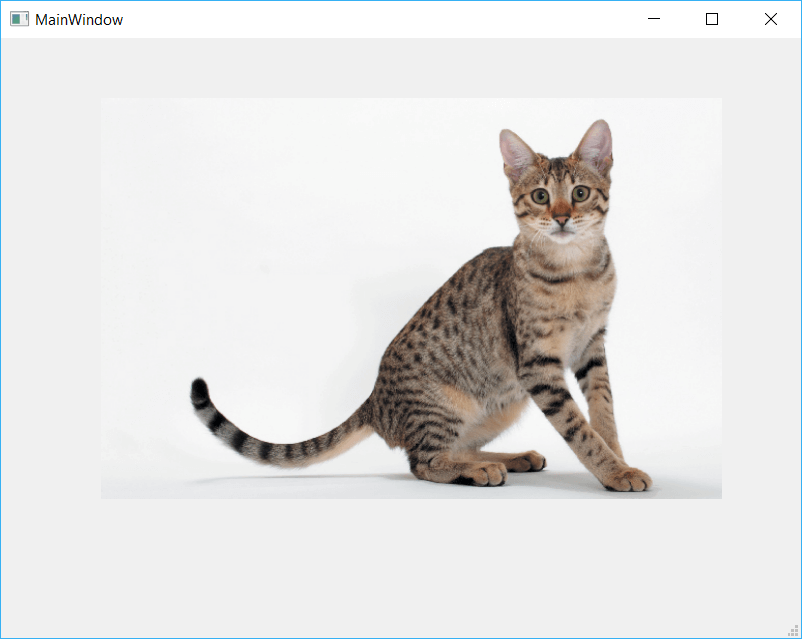 QtDesigner application showing a Cat
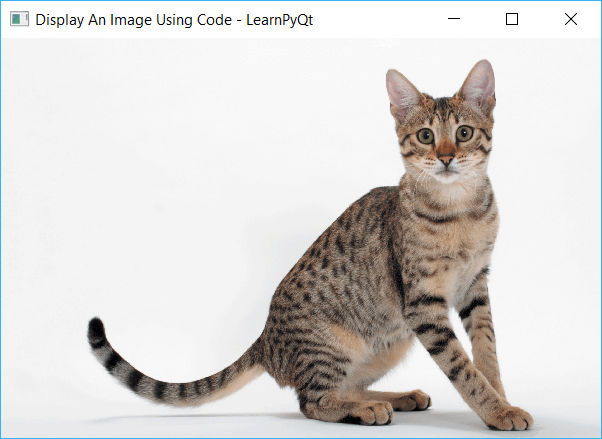 QMainWindow with Cat image displayed

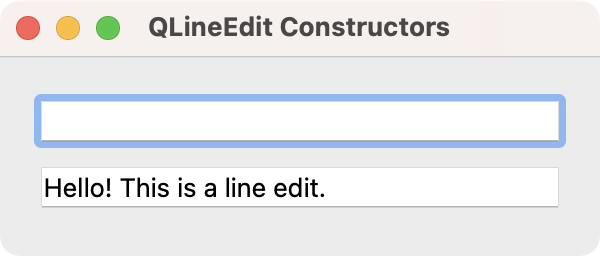 Standard window showing our two line edits.
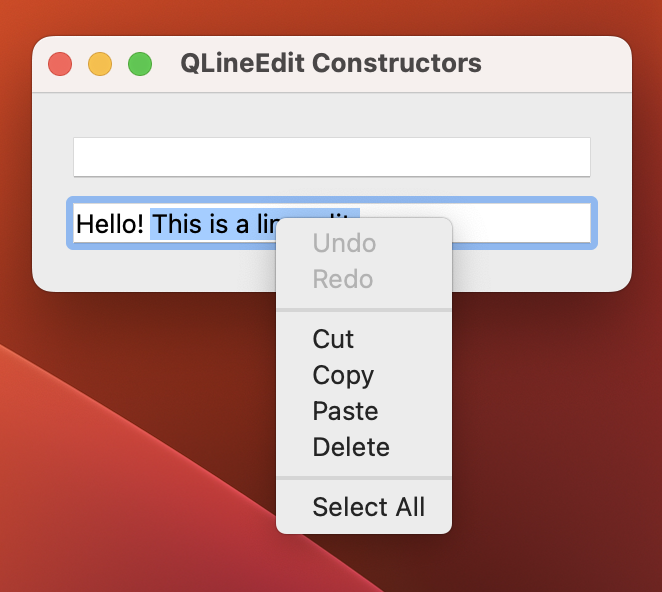 QLineEdit with a context menu visible.
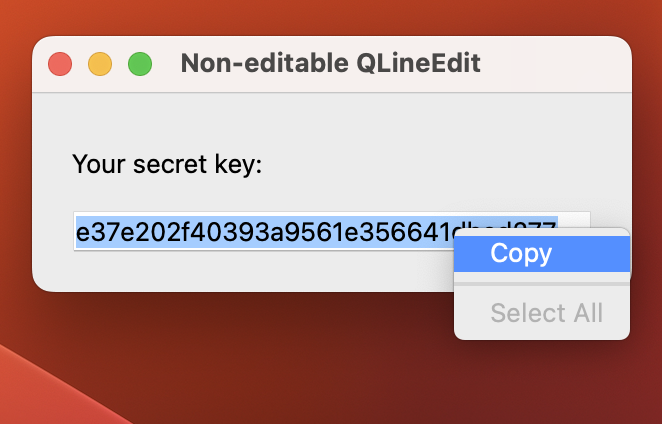 A read-only line edit with editing disabled.
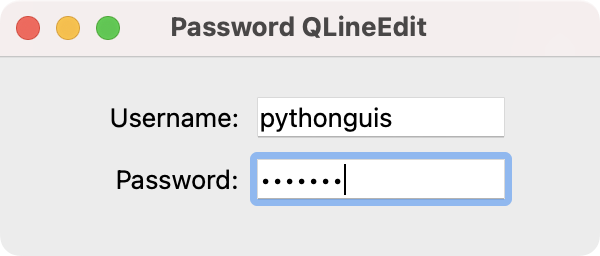 Window with a username and password line edit.
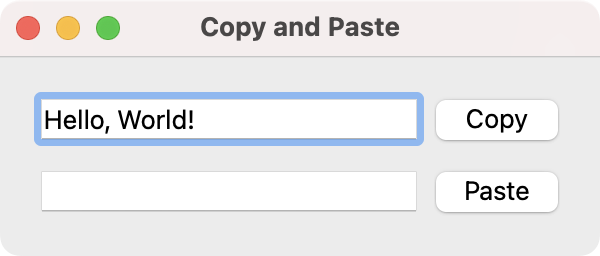 QLineEdit with Copy & Paste buttons attached to handlers.
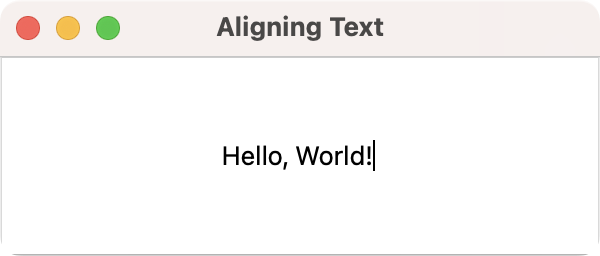 QLineEdit with text alignment set.
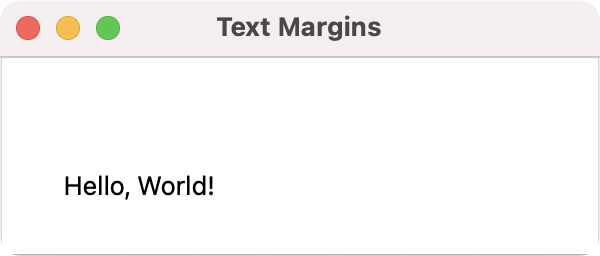 QLineEdit with text margins added.
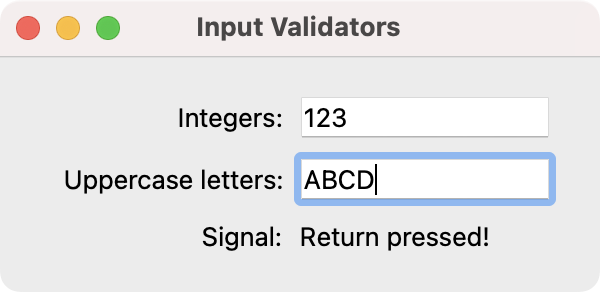 QLineEdit with input validator.


 py to announce KDDockWidgets version 2.0, a major milestone that brings many improvements and architectural enhancements to our powerful docking library.